3. ur_robot_driver - 실습
ur_robot_dirver with URSim(by docker image)
앞서 읽어보았던 ur_robot_driver를 직접 실행해보며 자세히 익혀본다.
조합은 위에 써져있는데로 real robot이 없으니 virtual mode를 수행한다. virtual mode는 ur에서 제공하는 URSim을 docker image로 실행하는 방법으로 진행한다. (emulator 역할)
1. 설치
설치는 Installation을 따라한다면 어렵지 않게 할 수 있다. 본인은 binary방식이 아닌 source방식을 이용했다. 직접 소스코드를 보면서 파악하거나, 수정, 편집하기 (나는) 더 편하기 때문에.
Installation of the ur_robot_driver — Universal Robots ROS 2 Documentation 0.1 documentation
You can either install this driver from binary packages as shown above or build it from source. We recommend a binary package installation unless you want to join development and submit changes. Note Controlling the robot using ROS raises the requirement f
docs.universal-robots.com
2. Setup
real robot을 사용할 때에도 진행해야 하지만, 현재는 virtual mode에 맞춰 setup을 진행했다. real robot을 사용할 경우에는 해당 case에 맞게 setup할 것.
Startup the driver — Universal Robots ROS 2 Documentation 0.1 documentation
initial_joint_controller (default: scaled_joint_trajectory_controller) - Use this if you want to start the robot with another controller. Note When the driver is started, you can list all loaded controllers using the ros2 control list_controllers command.
docs.universal-robots.com
위의 설명에 태그되어있는 setup, prepare 모두 진행.
하기 전에 사실 여기를 먼저 했다.
3. Simulation
본인은 virtual mode기 때문에.
첫 번째, docker로 URSim을 실행해야 한다.
docker run --rm -it universalrobots/ursim_e-series튜토리얼 추천에는 'ur_client_library' 패키지에 있는 start_ursim.sh을 실행하라고 하지만, ip설정이 올바르게 되는지 확실하지 않아 위의 명령어로 직접 실행했다.
위 명령어는 'universalrobots/ursim_e-series' docker image의 설명에 나와있는 명령어이다.
실행하면 다음과 같이 ip가 wsl에 맞게 설정되는 것을 확인할 수 있다.

이후 부터는 docs의 설명대로 진행한다. (ip만 172.17.0.2로 바꿔서)
일단 예제 따라서 진행한 결과 실행되지 않음. (Simulation 항목 따라서 실행시킨 뒤, Move the robot 항목 따라 command 내려봄)
ros2 launch ur_robot_driver test_joint_trajectory_controller.launch.py
출력으로는 'Starting point limits exceeded for joint ~~~' 라고 뜬다. controller들 active로 전환 해주고 실행해도 동일.
ros2 control set_controller_state scaled_joint_trajectory_controller activecontroller의 상태를 설정해주는 CLI
추가로 initial_joint_controller argument를 'joint_trajectory_controller'로 설정하고 실행해도 적용이 안된다. 왜일까?
뭔가 이상해서 python demo run을 실행해봄
ros2 run ur_robot_driver example_move.py그랬더니 출력은 action전달 됐고 traj수행중 이라고 뜨는데 안움직임. <-- 뭔가 이상함.

(This is real tomorrow??는 내가 확인을 위해 출력하라고 넣어 둔 것)
(virtual mode가 문제같다는 직감적인 생각이 들었다. 따라서 ip를 이상하게 설정하고 실행을 해보자)
172.17.0.5로 실행하면 실행 안됌. (wsl기준 ursim docker image를 실행한 container ip가 172.17.0.2이다)
-> 즉, 제대로 container와 통신해서 상태를 받고 실행되는거란 뜻.
Operation modes
ur_robot_driver docs에 Operation modes 라는 카테고리가 있다. 모드에 대한 설명인데 이 모드에 따라 로봇의 setup이 달라져야 한다고 한다.
먼저 모드를 구분하는 2가지 종류가 있다.
1. The ROS2 driver's mode of operation
2. The Robot's control mode
순서대로, ROS2 driver의 모드, Robot의 모드
그리고 각각 real robot인지 virtual mode 인지에 따라 모드가 나뉜다.
1. The ROS2 driver's mode of operation
- Teach Pendant mode : External Contrl URCap을 사용하는 것.
- Headless mode : teach pendat와 interaction없이 사용하는 것.(remote control mode가 됐을 때 이다.)
2. The Robot's control mode
- local control mode : teach pendant를 이용해야만 로봇을 control할 수 있는 경우.
- remote control mode : teach pendant는 locked일 경우. (이 모드로 바꾸는 방법은 robot의 셋팅에서만 가능하다)
이 설명을 봤을 때, 우리는 remote control mode로 Robot's mode가 설정되어있어야 한다. 현재의 모드를 그럼 확인해보자.
repository의 내부를 보니 'ur_dashboard_msgs'안에 GetRobotMode.srv 라는 서비스가 있다. 사용해보자
선언되어있는 service 목록을 보니 '/dashboard_client/get_robot_mode'라는 name으로 서비스가 선언되어있다.
ros2 service call /dashboard_client/get_robot_mode ur_dashboard_msgs/srv/GetRobotMode아래와 같은 출력을 반환했다.

RobotMode.msg에 POWER_OFF는 3으로 설정되어있다. 예상하던 결과는 아니지만, 예상치 못한 내용을 확인했다.
추가로 추천하는 'ur_client_library' pkg의 run_ur_sim.sh 파일을 이용해 보려고 했지만 192.xx기준으로 작성된 파일이라 wsl내에서 사용이 안됐음. 코드수정 or ip/port 조작 등 을 진행해야 할 것 같다.
위의 방법으로 하지 않고 docker를 따로 실행했을 때, 해당 링크로 열었다.( wsl내부에 firefox를 설치해주니 firefox가 열렸다. rviz열리듯이 )

여기서 우측의 connect를 누르니 UR의 TP ui가 떴다. (원래 바로 되야하는지 모르겠지만)

안되서 짜증나서 wsl다시깔았다. 삭제하고 재설치는 아래 포스트 참조...
새로 알게된 내용
URSim은 잘 작동한다. ( 재설치하니 잘됌ㅎ)
동일하게 그냥 docker run으로 실행중 (172.17.0.2로 진행)
URSim으로(polyscope ui) 로봇 jog하면 rviz에 잘 반영됌.
근데 제어가 안됌.
다른 방법 시도 ( simulation방법 중 다른 하나인 mock_hardware )
driver launch파일 실행 옵션으로 use_fake_hardware 옵션을 true로 지정해주면 된다.
ros2 launch ur_robot_driver ur_control.launch.py ur_type:=ur5e robot_ip:=172.17.0.2 launch_rviz:=true use_fake_hardware:=true initial_joint_controller:=scaled_joint_trajectory_controller
그랬더니 제어하는 launch파일 run파일 모두 잘 작동. ( 단 시작자세에 없으면 launch파일은 작동하지 않음. 시작자세=하늘방향 1자 자세 )
그래서 docs설명에 따라 URSim이용시 tp에서 remote control 모드로 지정해보기 시도.
(TP의 Remote Control에 대한 설명)
Remote Control
Remote Control Description A robot can either be in Local Control (controlled from the Teach Pendant) or Remote Control (controlled externally). Remote Control allows you to control the robots via external sources, such as controller sockets, I/Os and the
www.universal-robots.com
요약. (위에 설명된 내용이랑 비슷함)
로봇은 Local Control / Remote Control mode중의 하나이다.
Local : controlled from the Teach Pendent
Remote : controlled externally (external sources : sockets, I/Os, Dashboard Server)
(보통 UR Script로 짜서 넘기는데 사용한다)
까지 봤을때 여전히 돌파구가 안보임.
그러던 중 번뜩인 생각이
- URSim은 결국 Emulator이다. TP역할을 할 뿐 로봇(제어기포함)이 가상으로 돌아가는 것이다. ( TP는 애초에 sw니까 )
- 따라서, URSim을 켠 순간 부터는 real robot과 동일하게 셋업을 해줘야 한다.
- 그치만, External Control (URCap)을 설치해야만 하는건 아무리 생각해도 이상했음.
다시 확인해보니
여기서 돌파구를 찾음

- External Control URCap은 Headless mode가 아닐때 필요하다.
- headless mode는 remote control mode 이다.
- 중요, driver 실행시( ur_control.launch.py 실행시 ) headless_mode:=true 를 해줘야 한다.
했더니 robot move 예제까지 실행 완료.
예제 최종 정리
1. URSim을 실행한다. (docker image, 따로 docker run으로 실행해도 가능함)
docker run --rm -it universalrobots/ursim_e-series
2. UR Sim 실행 후, UR Driver 실행 전 해줘야하는 단계이다. 바로 robot을 headless mode로 설정하는 것. 이 설정 없이 driver를 실행한 경우 제대로 연결되지 않는다. 행여나 실수로 설정 없이 driver를 켰다? UR Sim을 재실행할 필요 없이 driver를 끄고, headless mode 실행한 뒤 driver를 다시 실행하면 된다.
2-1. Remote Mode설정 : Hamberger Manu -> Settings -> System -> Remote Control에 들어가 Enable을 클릭한다. 아래 사진과 같이 되어있다면 okay. 이후 좌측아래 'Exit'를 눌러 나가주자

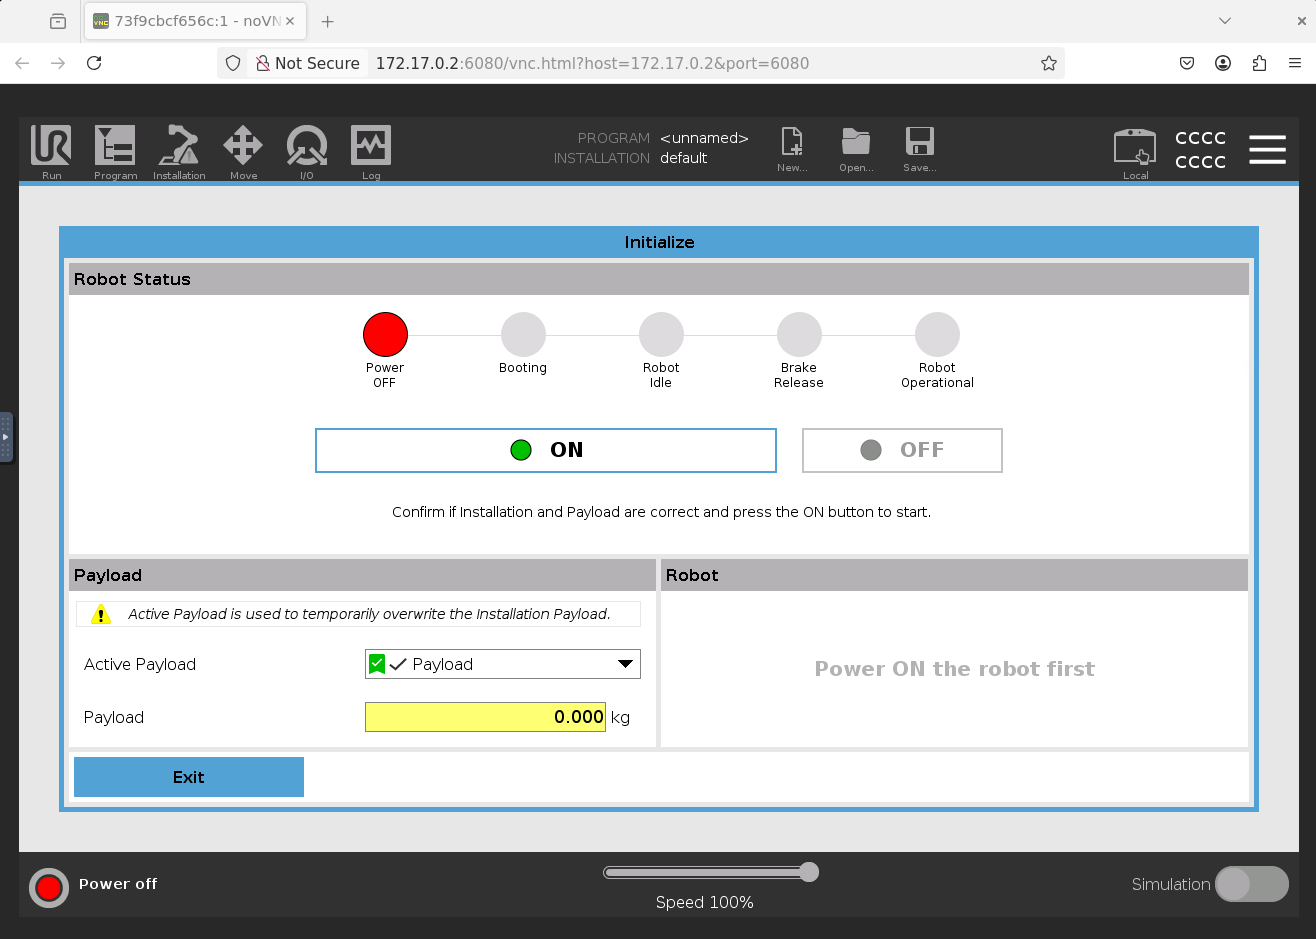
2-2. 그러고는 제일 좌측 아래 'Power off'를 눌러 로봇에 전원을 인가시켜주자. ON 누르면 'Robot Idle'로 변하고, 이후 ON이 Start로 변해 이를 또 누르면 'Robot Operational'로 변할 것이다.마찬가지로 Exit을 눌러 나가주자.

2-3. 여기서 끝이 아니다. 마지막으로 우측 상단에 현재 Local로 아이콘이 띄워져 있는데 이를 누르면 아래에 'Remote Control'이라는 버튼이 나타날 것이다. 이를 누르면 아이콘이 Remote로 바뀐다. (현재 Status에 Stopped가 떠있지만, Driver실행이 정상적으로 이뤄진다면 초록색 Running으로 바뀔 것이다.

3. UR Driver를 Headless mode로 실행한다. (ip는 위에서 docker를 직접 따로 수행한 경우에 해당하는 ip이다. 실행 방식 및 본인의 설정에 맞춰 입력되어야 한다.)
ros2 launch ur_robot_driver ur_control.launch.py ur_type:=ur5e robot_ip:=172.17.0.2 launch_rviz:=true headless_mode:=true
4. 로봇 제어하는 예제파일 실행한다. (driver처음 실행히 'scaled_joint_trajectory_controller'가 active되어 있다. 아래 두 예제는 모두 해당 controller를 이용한다.) 아래 명령어들은 모두 ur_robot_driver-Usage-Move the robot document에 있는 내용이다.
- launch파일 : 로봇의 자세에 따라 안돌아가는 경우가 있다.
ros2 launch ur_robot_driver test_scaled_joint_trajectory_controller.launch.py
- run파일 : 아직까진 어떤 자세에서도 실행이 가능했다.
ros2 run ur_robot_driver example_move.py
다음으로는 로봇을 움직이는데 사용되는 명령어들이 ROS action으로 진행되는데, action에 대한 간략한 리뷰, package간의 action송수신 및 로봇에게 직접적으로 어떻게 명령이 전달되는지(방식, api 등)을 파악해 볼 것이다.